Key takeaways
- Thin arepas: use medium-high heat and check early; they can dry out if left too long.
- Medium arepas: use medium heat and turn or rotate them if the appliance does not heat evenly.
- Thick arepas: use medium-low heat for longer cooking, or finish them in an oven after browning.
The best arepa maker for Venezuelan cooking is a six-cavity electric arepa maker for consistent thickness and speed, while a heavy stovetop griddle is the better choice for traditional crust, adjustable size, and long-term durability.
For most homes, choose an electric model that makes at least six arepas, has a cooking surface of about 7–8 inches (18–20 cm), nonstick plates, a floating or hinged top, and separate power and ready indicators. If you cook arepas only occasionally, a stovetop griddle is usually the better value because it takes less storage space and can also cook cachapas, pancakes, and tortillas.
Our top picks


As an Amazon Associate we earn from qualifying purchases at no extra cost to you. Ratings are shown as listed on Amazon.
Best arepa makers by cooking situation
| Best for | Recommended type | Typical plate or cooking area | Best arepa thickness | Typical price range in 2026 |
|---|---|---|---|---|
| Fast weekday breakfasts | Six-cavity electric arepa maker | 6 cavities, about 3.5–4 inches each | Thin to medium, 1–2 cm | $30–$70 |
| Traditional Venezuelan-style cooking | Cast-iron or thick aluminum stovetop griddle | About 10–12 inches overall | Any thickness, especially 1.5–2.5 cm | $25–$80 |
| Large, stuffed arepas | Single large electric press or reversible griddle | One 6–8 inch cooking area | Medium to thick, 2–3 cm | $45–$120 |
| Small kitchens and occasional use | Flat nonstick skillet or compact griddle | 10 inches or less | Thin to medium, up to 2 cm | $20–$60 |
Head-to-head: the three useful types
Six-cavity electric arepa makers
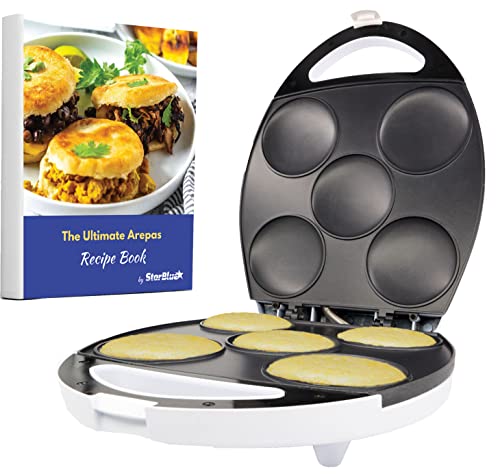
These are the easiest option when the priority is producing several evenly shaped arepas at once. Models such as the IMUSA Arepa Maker are designed around multiple round cavities, usually with nonstick cooking plates and indicator lights. The cavities do the portioning for you, so they are particularly helpful for beginners or households that want repeatable results.
The usual trade-off is size. A six-cavity plate commonly makes arepas around 3.5–4 inches (9–10 cm) across. That is a practical size for breakfast sandwiches, but it can be too small for very thick arepas filled generously with reina pepiada, shredded beef, black beans, or cheese. The hinge also limits how much dough can be used: overfilling can force dough into the hinge or edges.
Temperature control varies considerably. Basic units normally provide only an on/off thermostat and indicator lights. They can cook well, but they do not let you deliberately select a low temperature for a thick arepa or a higher setting for browning. Look for a model with a dial if you want more control; expect the cooking surface to become less uniform near the edges than at the center.
Stovetop cast-iron or thick aluminum griddles
A stovetop griddle is the most flexible choice. You can make two or three large arepas at a time, adjust their spacing, and choose any thickness before cooking. Cast iron retains heat well and develops a strong exterior crust, while aluminum heats faster and is easier to lift and wash.
The important limitation is that the pan does not regulate temperature. A thick arepa may brown on the outside before the center is fully cooked if the burner is too high. A reliable method is to begin at medium heat, turn the arepas several times, and finish them at lower heat with a lid. A griddle also rewards preheating: adding dough to a cold surface encourages sticking and uneven browning.
Cast iron requires more ownership care. Dry it immediately after washing, apply a very thin film of oil, and avoid leaving acidic food on the surface. The seasoning may wear where the arepas are repeatedly turned, but it can be rebuilt. A coated aluminum griddle is easier for casual cooks, although scratches, high heat, and metal utensils can shorten the coating’s life.
Single-cavity electric presses and reversible griddles
A single large press is a good compromise when you want electric temperature control but prefer big arepas. It generally makes one arepa around 6–8 inches wide and works best with medium-thickness dough. Reversible models can offer a smooth plate on one side and a ridged or flat griddle on the other, making them more useful beyond arepas.
These appliances are less efficient for a family breakfast. If one arepa takes 8–12 minutes and you need six, the total cooking time can approach an hour once batches and reheating are included. They are better suited to one or two people, large stuffed arepas, or cooks who value consistent heat more than speed.
Temperature control matters more than maximum wattage
Many electric arepa makers operate in the broad range of roughly 700–1,200 watts. Higher wattage can shorten preheating, but it does not guarantee better arepas. A thermostat that cycles predictably is more useful than a large power rating.
- Thin arepas: use medium-high heat and check early; they can dry out if left too long.
- Medium arepas: use medium heat and turn or rotate them if the appliance does not heat evenly.
- Thick arepas: use medium-low heat for longer cooking, or finish them in an oven after browning.
Most electric models are best at thin to medium arepas because the lid closes against a fixed cavity. For thick arepas, choose a floating hinge or a deep plate. A rigid shallow lid is more likely to compress the dough and leave a dense center.
Plate size and thickness: the practical calculation
Suppose you are cooking for four people and serving two 4-inch arepas per person. A six-cavity maker produces six at once, so you need two batches. If each batch takes 10 minutes including recovery time, cooking takes about 20 minutes.
A single 8-inch press may fit only one large arepa per batch. Even if each batch takes 8 minutes, eight arepas require approximately 64 minutes. The single press is preferable only if you want large arepas rather than eight small ones. For family breakfasts, cavity count usually matters more than the diameter of one individual cooking surface.
Cleanup and durability realities
Nonstick plates are the easiest to clean, but they should cool before wiping. Use a soft cloth or sponge, not abrasive powder, steel wool, or a knife to remove baked-on dough. If the plates are not removable, wipe around the hinge and the outer rim after every batch; dried masarepa there can prevent the lid from closing evenly.
- Most likely electric failure: the thermostat or power cord, especially if the unit is stored while still warm.
- First visible wear: the nonstick coating, usually from metal utensils or cooking spray residue.
- Common stovetop issue: warped thin pans that create hot spots.
- Common cooking mistake: packing too much dough into a shallow cavity, which causes edge overflow and an undercooked center.
Avoid aerosol cooking spray on nonstick electric plates unless the manufacturer permits it. Repeated residue can become sticky and discolor the surface. Lightly oiling the dough or wiping the plate with a small amount of neutral oil is usually easier to control.
Decision matrix
| Your situation | Best choice | Why |
|---|---|---|
| Beginner who wants uniform results | Six-cavity electric maker | Fixed portions and guided shape reduce technique errors. |
| Experienced cook making thick, heavily filled arepas | Stovetop griddle or deep single press | More control over thickness and slower cooking. |
| Small kitchen with limited storage | Flat skillet or compact griddle | It stores like ordinary cookware and serves several purposes. |
| Family cooking several times a week | Six-cavity electric maker | Batch capacity reduces total cooking time. |
| Cooking once or twice a month | Stovetop griddle | Lower cost and no dedicated appliance to store. |
| Need adjustable browning | Electric model with a temperature dial | Basic indicator-light models offer less control. |
How to get better results from any arepa maker
- Mix precooked corn flour with warm water and salt, then rest the dough for five minutes so the flour hydrates fully.
- Form portions according to the cavity or pan: roughly 90–120 grams for a 4-inch arepa and 150–220 grams for a large 6–8-inch arepa.
- Keep the surface slightly moist but not wet. Cracked edges usually mean the dough needs a little more water or kneading.
- Preheat the appliance or pan before adding the dough.
- Cook until the exterior is set and lightly browned, then lower the heat if the center remains soft.
- Rest the finished arepas for two minutes before slicing; this reduces crumbling and makes filling easier.
Final recommendation
Choose a six-cavity electric arepa maker if speed, repeatability, and easy portioning are your priorities. Choose a stovetop cast-iron or thick aluminum griddle if you care more about flexible sizing, thick arepas, traditional browning, and long service life. A single large electric press is the niche choice for cooks who want temperature control and oversized stuffed arepas but do not need to produce a full batch quickly.